Next-Generation Bastion: SSH Tunneling to RDS & EC2 without Public Facing Infrastructure
In this post we will be covering how you can use AWS SSM Session Manager and an SSH proxy to perform tunneling. This will allow you to connect to RDS and EC2 instances without the requirement of public facing infrastructure.
The Old
If you have designed your AWS network according to best practices you likely use a bastion server to connect to resources within a private subnet. In terms of this blog a bastion server is a specially hardened server that will act as a single point of ingress into an application VPC. Bastion servers are often internet facing in a DMZ but can be locked down with security groups.
A secure network using bastions may look something like below.

Here the end administrator is using an SSH tunnel to connect through the bastion to the RDS instance located in the Application VPC’s Private Subnet A. This is a pretty common configuration and when using network ACL’s and security groups this is quite secure. However, you must still have a public IP address that is accessible from the internet. Misconfigurations of Network ACLs and security groups could lead to exposure resulting in brute force attacks and pesty port-probes.
The New
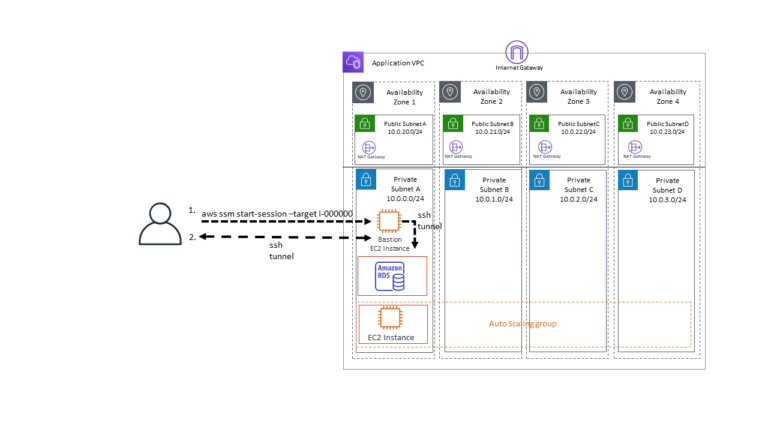
The problems of the past have been resolved! Well… kind of. You are still required to have a bastion server, however this bastion server does not need to live in the DMZ and within a separate VPC. Instead we can leverage AWS Systems Manager Session Manager to tunnel to resources such as RDS and other EC2 instances. Ideally this would be entirely through the AWS SSM client, however until then, here is how you can do it with Session Manager and an internal bastion server.
With this new configuration using AWS SSM Session Manager I’m able to strip out the entire bastion VPC. The network architecture then looks similar to below.
To get started using AWS SSM Session Manager with an internal bastion we will need to configure some stuff. Really there are three components that require configuration, Session Manager, the client ~/.ssh/config file, and the internal bastion.
For this example we will assume that some fundamental configurations exist. For further instructions on how to configure the resources below, please refer to the AWS documentation.
Assumptions
- AWS CLI Installed and Configured.
- Permissions to use AWS SSM.
- A private VPC that is not accessible from the internet.
- An EC2 instance deployed into a private VPC. (Internal Bastion)
- The latest AWS SSM Agent installed and working on the bastion EC2 instance, including the instance having the appropriate SSM instance role.
- A MySQL RDS Instance Deployed to the same Private VPC.
- Security groups configured on the RDS to allow connection from the internal bastion.
- SSH (we’ll be using Linux in this example).
Internal Bastion Configuration
After you have launched your new internal bastion server with the AWS SSM agent installed and the appropriate IAM role associated with the instance we can begin configuring users.
Configuring users on this instance will be no different than configuring them on a regular Linux server. However later we will touch on some enhancements & automations that can help streamline the use of this technology.
Connect to the newly configured internal bastion server by running
aws --profile <your aws profile> ssm start-session --target <your internal bastion instance-id>
This will drop you in as a default user with the ability to escalate to root privileges. This will be useful for our initial configuration in this example. However later on in this blog post we will be covering how to revoke those permissions.
On the internal bastion host create the necessary users with their ssh keys in their respective authorized_keys files. If you are unfamiliar with adding SSH users to a linux instance see the document below.
https://aws.amazon.com/premiumsupport/knowledge-center/new-user-accounts-linux-instance/ Once the users have been added exit the bastion server.
Session Manager Configurations
Navigate to AWS Systems Manager > Session Manager > Preferences.
Here we will “Enable Run As support for Linux instances” and enter an arbitrary username that you would like session manager users to connect as. This is recommended because if not selected the default user has the ability to escalate to root.
You may enable KMS encryption to encrypt session data. If you do not select this session data will still be encrypted but with only TLS 1.2. Enabling KMS encryption will use both KMS to wrap the session data and TLS 1.2.
Furthermore we have chosen to send our session outputs to CloudWatch logs. This is optional but recommended if you wish to have an audit trail.

SSH Configuration
The key to being able to access other resources within the VPC once connected to the internal bastion is to use the internal bastion as a proxy. To do this we will configure our ssh config file, on linux machines this is located ~/.ssh/config .
Open ~/.ssh/config with the text editor of your choosing and add the following entry.
# SSH over Session Manager
host i-* mi-*
    ProxyCommand sh -c "aws --profile default ssm start-session --target %h --document-name AWS-StartSSHSession --parameters 'portNumber=%p'"
This entry will configure your ssh client in a way that anytime you initiate an ssh session to a host beginning with “i-” or “mi-” the “aws ssm start-session” command will be executed as well.
You may note that we have -profile default configured in here. In this example I’m using my default aws profile, if you are performing this example in an environment other than your default one, replace default with your aws profile name.
You might wonder what to do if you have multiple AWS profiles. If that is the case you can copy and paste the entry in your config file replacing “i-*” with the specific bastion instance-id for the respective environment.
Alternatively you might want to use an environment variable that you export such as.
# SSH over Session Manager
host i-* mi-*
    ProxyCommand sh -c "aws --profile $AWSPROFILE ssm start-session --target %h --document-name AWS-StartSSHSession --parameters 'portNumber=%p'"
This requires you to run “export AWSPROFILE=your_aws_profile_name” whenever you wish to connect to the desired AWS environments bastion.
Connecting
Now that you have configured everything we can attempt our first connection.
I will assume you have either logged into AWS SSO and got your temporary STS tokens or are using AWS access keys. Whichever approach the user connecting must have the ability to perform ssm:StartSession and ssm:TerminateSession.
You will now be able to connect to your internal bastion server by running the following command.
ssh <username>@<instance-id>
For example:
ssh blogexample@i-000000000
If the username on your local machine is the same as the username on the bastion along with the configured ssh key, you will be able to just run ssh and the instance id of your internal bastion.
ssh i-0000000
You should note that this has dropped you into your home directory as the user we configured earlier.
[blogexample@i-000000000 ~]$ whoami
blogexample
[blogexample@i-000000000 ~]$ pwd
/home/blogexample
If you wish to port-forward to an RDS instance all that is required is that the internal bastion’s security group is able to communicate with RDS and you have the necessary RDS credentials. To initiate the connection you can run:
ssh blogexample@i-000000000 -L 3306:<your-rds-datbase-name>.us-east-1.rds.amazonaws.com:3306
You then are able to login to the RDS instance from your client machine via localhost:3306.
This port-forwarding can be applied to other resources within your environment. For example if you have another instance running in the private subnet with a private IP 10.0.2.60 website running on port 8080, you could connect to it like so.
ssh blogexample@i-000000000 -L 8080:10.0.2.60:8080
You would then be able to open up your client browser to localhost:8080 and access the website.
Take-away
Here we provided a working example of how you can eliminate any public facing instance. We also proved that you are able to connect to other resources within side your VPC by leveraging an internal bastion.
It is also important to note that even if a user SSH key is somehow forgotten and left on the bastion host, the user will not be able to connect to the bastion unless they have an AWS IAM account or are an authorized federated user.
I realize the example I have provided isn’t a perfect solution. There are actually several enhancements that you can add to make this solution more streamlined. We will cover this in the enhancements section.
Enhancements
Automated User Provisioning
As you can imagine provisioning users on the internal bastion can be cumbersome. However, this is easily solved through automation. You may use a pre-baked AMI that has the SSM agent installed and a user you can connect to that has permissions to provision users. Furthermore you might consider leveraging Ansible, Chef, or Puppet to add and remove users from the internal bastion.
This is easily done using AWS OpsWorks. You can create a new stack for your bastion and leverage OpsWorks to add or remove users. I have found this to be the simplest and most streamlined approach when operating within AWS.
Removing the ssh-user
Multiple users connecting to the bastion host and using the ssh-user account doesn’t seem desirable for an audit trail. What we have discovered through feature or bug is that the user we provisioned “ssh-user” can actually be removed from the bastion host. Authenticated users then do not have the ability to gain a shell without a profile on the internal bastion system.
This is desirable because it only leverages SSM for initial authentication and initialization of the proxy and then leverages SSH for authentication on the internal bastion. Again it is important to note that removal of a user from AWS IAM or in the case of them being federated, the IDP, they will not be able to login to the bastion server from outside the VPC. You must have both access keys/ federation AND user profile on the bastion server.
By removing this user you will not be able to connect to SSM from the AWS Console.
Tags & Policies
You can further enhance your environment’s flexibility by leveraging tags. By adding a tag with the key value pair “AccessGranted”:”true” and “ServerType”:”bastion”. We are able to create policies that limit the scope of what SSM can connect to. For example users that you wish to only be able to leverage SSM to connect to the bastion you can add the following to their IAM role.
{
    "Version": "2012-10-17",
    "Statement": [
        {
            "Effect": "Allow",
            "Action": [
                "ssm:StartSession"
            ],
            "Resource": [
                "arn:aws:ec2:*:*:instance/*"
            ],
            "Condition": {
                "StringLike": {
                    "ssm:resourceTag/ServerType": [
                        "bastion"
                    ],
                    "ssm:resourceTag/AccessGranted": [
                        "true"
                    ]
                }
            }
        },
        {
            "Effect": "Allow",
            "Action": [
                "ssm:StartSession"
            ],
            "Resource": "arn:aws:ssm:us-east-1:*:document/AWS-StartSSHSession"
        },
        {
            "Effect": "Allow",
            "Action": [
                "ssm:TerminateSession"
            ],
            "Resource": [
                "arn:aws:ssm:*:*:session/${aws:username}-*"
            ]
        }
    ]
}
If we then set the value for “AccessGranted” to false, users with this policy attached to their role will not even be able to connect to the bastion. This also prevents them from accessing other resources within your environment that might have the SSM agent and not be a bastion server.
I will warn that this isn’t to replace any security controls you might have in place within your environment. This can just add a layer of difficulty so a user doesn’t accidentally connect to a resource and do something to mess it up. That being said, continue to control user access as necessary and don’t rely on the above policy as a reason to give carte blanche access to users.